
Configuring Alerts for Failed Business Processes within Blackbaud CRM™
- Nov 17, 2020
- 2 min read
By: Bethany Avery
Have you ever wondered how to set up an alert for a failed business process in Blackbaud CRM™? From queues that are prerequisites for other business processes to mission-critical imports - there are many reasons a power user or Blackbaud CRM™ support team would want to monitor critical business processes.

Not only that, if there is an issue, it’s always better to find it yourself than to be informed of a failure by an end-user whose data is missing or whose deadline has already passed. No fun!
Fortunately, it’s pretty simple to set up a Blackbaud CRM™email alert for this scenario. An email alert starts with a user-defined data list. Begin by selecting the “Business Process Status” record type as your source view:

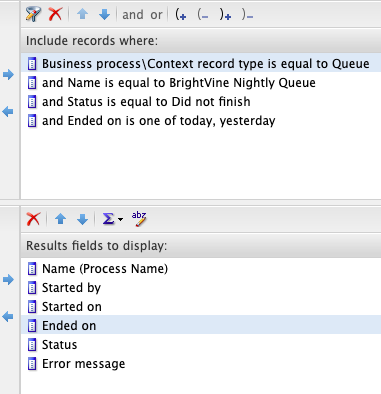
The basic things you’ll want to include in your criteria are:
Business Process Context Record Type (i.e. Queue, Constituent Merge Process, Import Process, or whichever business process type you are monitoring)
The exact name of the business process
Statuses you care to be alerted for (i.e. Did Not Finish, or Completed with Exceptions). You can use “One of” to monitor both.
Lastly, when configuring a daily email alert I like to filter the output to those processes that ended today or yesterday so that I don’t continue to have failures from months prior in my data list output.
For your output, you’ll want to include any fields you wish to include in the actual email notification, as well as a date field that can be used as the “trigger” for when to send the alert. Typically the Process Name, Start/End Times, Status, and Error Message will inform you of the essentials. Here’s a snapshot of what all of that would look like:
Next, create your data list as shown below. It’s not necessary to add a “Context record ID field”, you can leave that blank. But you do need to go to the often-overlooked “Alert options” tab and select “Allow this datalist to be used for feed alerts.” There you select the trigger date mentioned earlier; I typically use “Ended on.”


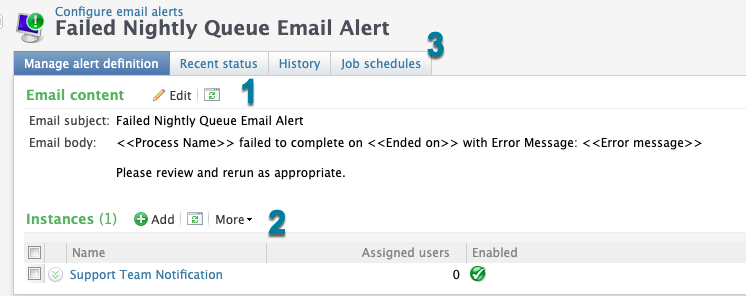
From there, head over to Administration > Email Alerts > Custom Email Alerts, and add an Email Alert that points to your newly created data list. Once added, complete the following three steps:
Edit the content of your alert (i.e. the body of the email that goes out)
Add an instance and assign the application users you wish to receive the alert
Create a job schedule for the alert. Keep in mind that because you’re unlikely to know exactly when the processes may fail, your job schedule should be set up to run multiple times in a window that correlates to the typical or expected end time. For example, if an import that typically completes at 10 AM, and is due by noon- you could configure a job that runs every 15 minutes between 9:30 and 10:30 AM.
And there you have it! With this simple alert structure (which can be tailored to many scenarios), you’ll be well on your way to staying informed and proactively addressing those unfortunate hiccups that do occur.


Comments